[Sebastian] needed a small solder oven so he bought himself a small toaster oven (Spanish, Google Translate). It’s not the kind of thing we’d make our breakfast in now, but for soldering it’s a very nice oven.
After a little bit of research on Google, [Sebastian] discovered that the best technique when dealing with reflow ovens and solder paste is following a specific temperature curve. Ideally, Tin/Lead solder needs to preheat from room temperature to 150 degrees C, then level off so the flux can activate. After that, a quick jaunt above 183 degrees C makes the solder flow. To get his toaster working optimally, [Sebastian] stuck a thermistor in the toaster and measured the temperature profiles of different ‘modes.’
The correct temperature curve was calculated using different heater elements and [Sebastian] was off to the races. He did have a few problems on his first few boards – solder bridging, mostly – but that’s not the fault of the oven. An LCD display (translate) was added recently so accurate real-time temperature monitoring is available.
SMD components have a lot of advantages over the through-hole parts our fathers and grandfathers soldered. Working with these tiny surface mount components requires a larger investment than a soldering iron and a wire-wrap gun, though. Here’s a few reflow ovens that were sent in over the past week or two.
[ramsay] bought a 110 V toaster oven off of eBay. Even though [ramsay] is in England and has 230 V mains, everything in the oven is mechanical and works just fine with a higher voltage. His first test didn’t go quite as planned; the solder paste wasn’t melting at 120° C, so he cranked up the temperature and learned that the FR in FR-4 stands for flame retardant. Never deterred, [ramsay] decided to build a controller so the temperature ramps up and cools off at the right rates for the flux and paste to do their thing.
Solder paste has a temperature profile that requires the board to be kept at a temperature between 150° and 180° C for a minute or so before climbing up to 220° for a second so the solder will melt. [Nicolas] had the interesting idea of putting a USB port in his toaster oven and storing the heating profiles on his desktop. The build uses an MSP430 microcontroller to turn the relays powering heating elements on and off. [Nick] is working on a C# desktop app to monitor and regulate the oven temperature from his computer, so we’re fairly interested in seeing the final results.
Watching the SMD self-alignment videos on YouTube is a lot more fun than messing around with tweezers, stereo microscopes, and extremely fine soldering irons. If you’ve got a better idea for a toaster/reflow oven, send it in on our tip line and we’ll check it out.
The Makerbar, Hoboken’s Hackerspace, was in desperate need of a reflow oven. Hurricane Sandy did a number on a whole bunch of household appliances, so when [Kush] saw a neighbor throw out a broken toaster oven, the Makerbar crew sprung into action.
The storm waters shorted the electronics board, fried the existing controls, and basically turned the oven into a metal shell with heating elements. It was the perfect platform for a toaster oven – every part that was going to be thrown out was already destroyed.
[Zach] over at the Makerbar ordered the Sparkfun reflow toaster conversion kit along with a few arcade buttons and set to work. After plugging the heating elements into the mains power to make sure they still worked, [Zach] attached these elements to the relay on board the controller. Three arcade buttons were wired up to the controller, and a whole bunch of code was written.
With the included thermocouple, [Zach], [Kush], and the rest of the Makerbar gang now have a very accurate and reliable reflow oven. There’s also settings for Sculpey clay and shrinky dinks, just in case anyone at Makerbar is feeling a bit creative.
For some reason or another, the Hackaday tip line sometimes sees a short burst of submissions for the same project. The latest one of these was for toaster oven reflow stations. They’re both great builds and different approaches to making a useful tool out of home appliances.
First up is [Richard]‘s build. he ended up with a fairly high-end build using a Rocket Scream Reflow Oven Controller Arduino shield. This shield accepts a normal K-type thermocouple and controls an external solid state relay with the Arduino’s PID library. [Richard]‘s build has a few neat additions – a properly dremeled enclosure, computer fan, and a welding blanket for insulation. Now that we think about it, it’s odd we’ve rarely seen any sort of insulation in these reflow oven builds.
Next up is [Ray]‘s version of a Black & Decker reflow oven. While not as fancy as [Richard]‘s build, this one does have a few features that make it very interesting. Instead of messing around with thermocouples, [Ray] simply took a digital kitchen thermometer – a neat tool that already a thermistor in a compact metal probe – and read the analog value with an Arduino. To control the power, [Ray] is using a cheap 433 MHz radio transmitter to control a few remotely operated power sockets. It’s a very clever and inexpensive replacement for a SSR, especially since [Ray] had these power sockets just lying around.
So there you go. The same tool, built two different ways. A great demonstration of how you can not only build anything, but you can build anything any way you want.
Around here, reflow ovens usually mean a toaster oven, and if you’re exceptionally cool, a thermistor and PID controller. There are, of course, a thousand ways to turn solder paste into a solid connection and [Saar] might have found the cheapest way yet: a hair straightener with a street value of just £15.
We don’t expect the majority of the Hackaday demographic to know much about hair straighteners, but [Saar] has done all the work and came up with a list of what makes a good one. Floating plates are a must to keep the PCB in contact with the heating element at all times, and temperature control is essential. [Saar] ended up with a Remington S3500 Ceramic Straight 230 Hair Straightener, although a trip to any big box store should yield a straightener that would work just as well.
One modification [Saar] added was a strip of Kapton tape to one of the ceramic heating elements. It’s not a replacement for a toaster oven or real reflow oven, but for small boards it works just as well.
Homemade reflow ovens are a great inexpensive way to quickly solder multiple prototypes at once. [Andy] may just have built one of the best ones we’ve featured so far on Hackaday. For his project a £25 1300W 12litre halogen oven was chosen because of its low cost and fast heating time, the latter being required to follow typical reflow profile ramp-up stages.
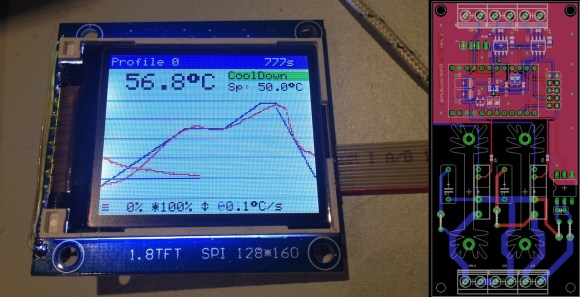
To control the AC power [Andy] first bought a chinese Fotek Solid State Relay (SSR) on ebay, which was quickly replaced by an american one after reading concerning reports on the internet. He then made the same ‘mistake’ by buying the typical MAX6675 thermocouple-to-digital converter from the same website, as he spent much time understanding why the measurements were wrong when the IC was just defective. His final build is based around a 640×360 TFT LCD that he previously reverse engineered, the cortex-M0 STM32F051C8T7, a SPI flash, some power regulators and buttons. The firmware was written in C++ and we’ll let our readers visit [Andy]‘s page to see how well his oven performs.
A reflow oven is one of the most useful tools you will ever have, and if you haven’t built one yet, now is as good a time as any. [0xPIT's] Arduino based reflow oven controller with a graphic LCD is one of the nicest reflow controllers we’ve seen.
Having a reflow oven opens up a world of possibilities. All of those impossible to solder surface mount devices are now easier than ever. Built around the Arduino Pro Micro and an Adafruit TFT color LCD, this project is very straight forward. You can either make your own controller PCB, or use [0xPIT's] design. His design is built around two solid state relays, one for the heating elements and one for the convection fan. “The software uses PID control of the heater and fan output for improved temperature stability.” The project write-up is also on github, so be sure to scroll down and take a look at the README.
All you need to do is build any of the laser cutters and pick and place machines that we have featured over the years, and you too can have a complete surface mount assembly line!
With a lot of people who are suddenly too cool for through hole and of course the a few generations of components that are only available in SMD packages, it’s no surprise the humble toaster oven has become one of the mainstays of electronic prototyping. You’re gonna need a controller to ramp up those temperatures, so here are two that do the job quite nicely.
[Nathan]’s Zallus Oven Controller is a bit different than other reflow controllers we’ve seen on Kickstarter. He’s offering three versions, two with different sized touch screen displays, and one that is controlled with a PC and push buttons. The display for these is beautiful, and of course you can program your own temperature profiles.
No, reflow oven controllers aren’t new, and they aren’t very exciting. They are, however, tools to build much cooler stuff, and a great addition to any lab.
The T-962A is a very popular reflow oven available through the usual kinda-shady retail channels. It’s pretty cheap, and therefore popular, and the construction actually isn’t abysmal. The controller for this oven is downright terrible, and [wj] has been working on a replacement firmware for the horribly broken one provided with this oven. It’s open source, and the only thing you need to update your oven is a TTL/UART interface.
[WJ] bought his T-962A even after seeing some of the negative reviews that suggested replacing the existing controller and display. This is not in true hacker fashion – there’s already a microcontroller and display on the board.
The new firmware uses the existing hardware and adds a very necessary modification: stock, the oven makes the assumption that the cold-junction of the thermocouples is at 20°C. The controller sits on top of an oven with two TRIACs nearby, so this isn’t the case, making the temperature calibration of the oven slightly terrible.
After poking around the board, [WJ] found an LPC2000-series microcontroller and a spare GPIO pin for a 1-wire temperature sensor. The temperature sensor is placed right next to the terminal block for the thermocouples for proper temperature sensing.
All the details of updating the firmware appear on a wiki, and the only thing required to update the firmware is a serial/USB/UART converter. A much better solution than ripping out the controller and replacing it with a custom one.
[Ed] owns a 3-zone reflow oven (which he coincidently uses to manufacture reflow oven controllers), but its performance has gotten worse and worse over time. The speed of the conveyer belt became so inconsistent that most boards run through the oven weren’t completely reflowed. [Ed] decided to rip out the guts of the oven and replace it with an Arduino, solving the belt problem and replacing the oven’s user-unfriendly interface
When [Ed] was looking into his belt speed problem, he discovered that the belt motor was controlled by an adjustable linear regulator with no feedback. Although this seems a bit sketchy by itself, the motor also had some mechanical issues and [Ed] ended up replacing it entirely. After realizing that closed-loop speed control would really help make the oven more consistent, [Ed] decided to overhaul all of the electronics in the oven.
[Ed] wanted to make as little custom hardware as possible, so he started out with an Arduino Mega and some MAX31855’s that measure multiple thermocouples in the oven. The Arduino controls the belt speed and runs PID loops which control heating elements in each of the oven’s 3 zones. The Arduino can be programmed with different profiles (stored in EEPROM) which are made up of 3 zone temperatures and a conveyor speed. Don’t have a 3-zone oven of your own to hack? Check out some DIY reflow oven builds we’ve featured before.
[Will] had a few reasons for turning a toaster oven into a reflow oven – he needed a project for an ECE lab, the lab’s current reflow oven was terrible, and the man is trying to keep [Will] down by not allowing toaster ovens in dorm rooms. What was born out of necessity actually turned into a great project – a reflow oven with touchscreen controls.
The toaster oven used for this build is a model [Will] picked up at Sears. It’s actually pretty unique, advertised as a ‘digital toaster’. This isn’t marketing speak – there’s actually a thermistor in there, and the stock toaster is closed loop. After disassembling the toaster and getting rid of the guts, [Will] whipped up a PCB for a Teensy 3.1 and the Adafruit capacative touch shield.
With the Teensy and touch screen, [Will] came up with an interface that looks ten times better than anything you would find on a Chinese auction site. It’s a great build, and since it’s kept in the electronics lab, will certainly see a lot of use.
Using a toaster oven to reflow solder isn’t a new idea. But [Sukasa] wanted something that had more features and improved appearace. So he married a Netduino, a toaster oven, and some solid state relays to made a clean-looking reflow oven. His goal was to have nothing look like an overt modification to a casual observer. Inside, however, the oven now has a network connection for system status via a Web browser or JSON.
The new brains of the oven are a Netduino Plus 2 and an I2C port expander that connects to a few extra I/O devices. The challenging I/O, though, is the heaters. When cold, the oven can draw over 16 amps, so a pair of 12A solid state relays in parallel handle that load. There are also two fans: one to keep the electronics cool and another on software control. An IGBT allows the controller to pulse width modulate the fan’s output. A pair of MAX31855s read the thermocouples that report the temperature.
The controller was a mashup of the existing oven’s keypad and an add-on LCD display (see right). One thing we didn’t see was a schematic. Of course, you can read the code and figure out how it is all connected and (unless you use the exact same oven) you are probably going to need to modify things to suit your particular setup, anyway.
We’ve seen other good looking reflow oven and controller builds in the past, including one with a touchscreen. It is also worth noting that you can find reflow ovens at relatively low prices now if you don’t feel like rolling your own.
By 2016, most people have got the hang of doing SMD soldering in the garage–at least for standard packaging. Ball Grid Array or BGA, however, remains one of the more difficult packages to work with [Colin O’Flynn] has an excellent video (almost 30-minutes, including some parts that are sped up) that shows exactly how he does a board with BGA.
[Colin] uses some spare boards to lock the target board down to his bench and then uses a custom stencil and solder paste to prep the board. Once he has the solder paste on, he places the components using a homebrew air tweezer and some regular tweezers.
For reflow, [Colin] uses the common T-962A with the open source firmware. Two other modifications to the oven: a custom vent hood with a carbon filter and a Jolly Wrencher sticker for decoration (we heartily approve).
[Colin] uses a microscope to do some inspection of the board, although the BGA could have concealed faults that would be hard to spot. At the end of the video, he did find a short (but not on the BGA, luckily, so it could be reworked by hand). He also melted a header shroud that would require rework.
The detail in this video is like spending an hour in [Colin’s] shop getting a first-hand look at the process and if you haven’t done this before–or you just want to pick up some of his tips–there’s a lot of value to that. We’re beginning to get spoiled with all the work [Colin] puts in to share his skills and knowledge. He presented a fantastic USB workshop at the 2015 Hackaday SuperConference, and did an amazing job of designing and documenting high-end embedded hardware security equipment with the second place winner in the 2014 Hackaday Prize: ChipWhisperer.
If there is one tool every hardware hacker needs, it’s a good soldering setup. Soldering irons, heat guns, reflow ovens and the like make up the tools of the trade for building electronic circuits. Spend enough time working with a tool, and you’ll find a way to improve it. It’s no surprise that hackers, makers, and engineers have been hacking their soldering tools for decades. This week’s Hacklet features some of the best soldering tool projects on Hackaday.io!
We start with [Kuro] a Hakko 907 based Soldering Station. Hakko 907 and 936 soldering station clones from the Far East are available all over the internet. While the heaters work, none of them have very good temperature controllers. [Kuro] turned a problem into a project by building his own soldering station. These irons are rated for 24 V. 24 volt power supplies are not very common, but it’s easy to find old 19 volt supplies from discarded laptops. [Kuro] found that the lower voltage works just fine. An Arduino nano controls the show, with user output displayed on a 2 line LCD. The finished controller works better than the original, and probably would give a real Hakko model a run for its money.
Next up is [Sukasa] with Reflow Oven. When MakerSpace Nanaimo needed a reflow oven, [Sukasa] jumped in with this design. The idea was to create an oven that looked unmodified – just think of it as the toaster oven of the future, or the reflow oven of today. A Netduino plus 2 is the main controller. User information is displayed on a color TFT LCD. This oven is even internet connected, with an internally hosted web page and JSON data feed. The Netduino controls two beefy Solid State Relays (SSRs). The SSRs handle the dirty work of switching the oven’s heating elements. Two fans keep air moving to avoid hot spots. Precision temperature sensing is achieved through a pair of Adafruit MAX31855 breakout boards reading thermocouples.
Next we have [Jaromir Sukuba] with Soldering preheat plate. When soldering surface mount components, like QFN or BGA parts, it helps to pre-heat the whole board. There are commercial products to do this using hot air and other techniques, but it really comes down to making a hotplate. [Jaromir] figured he could do a pretty good job at this, so he built his own with a 3mm aluminum plate. Heat comes from 6 resistors in TO-220 cases. A Microchip PIC18 monitors a thermocouple and keeps things from getting too hot. For power, [Jaromir] had the same idea as [Kuro] did, and used a 19V power brick from an old laptop.
Finally we have [Alex Rich] with Locking ball and socket gooseneck system. [Alex] came up with the Stickvise, so it’s fitting that he comes up with an awesome upgrade for it. We’ve all fought with “helping hands” while soldering. You never get them at quite the right angle. This system fixes that with a simple ball and gooseneck setup. [Alex] saw a similar design and printed it out. While it worked, the pieces popped apart too easily. [Alex] redesigned the system, adding a threaded locking ring. These new goosenecks stay put, holding your work exactly where you want it.
If you want to see more soldering tool projects, check out our brand new soldering tools list! If I missed your project, don’t be shy! Just drop me a message on Hackaday.io. That’s it for this week’s Hacklet. As always, see you next week. Same hack time, same hack channel, bringing you the best of Hackaday.io!
There are a variety of methods for reflowing a circuit board, but they all rely on a single principle: heat up the solder paste (a mixture of flux and solder) until the flux burns off and the solder becomes liquid, and then cool it down. Accomplishing this once or twice is easy; once you’ve played with a hot plate you’ll swear off through hole. Scaling it up and doing it repeatedly with high yield is extremely challenging, though.
Hot Plate
A hot plate with aluminum on top. Some breakout boards are just starting to flow.
Starting off with the most basic tools available we have the hot plate or griddle method. This involves an electric hot plate ($20 investment). Usually around medium heat is a good setting for most of these plates, and you know it’s ready when you can put some solder on it and it turns to liquid. Then you place the board on the hot plate and wait and watch until everything has flowed, then wait a little longer until most of the flux has burned off, then you take it off the plate. Generally you want to move the PCB around with tweezers or needle-nose pliers during this process, as there will usually be hot spots and you want everything to flow at roughly the same time. DO NOT use the fancy science hot plates with the magnetic stirrers in them. When the paste starts to flow the reduced friction will allow certain components, especially inductors, to fly across the board as they are attracted to the magnet, causing a hot mess. It’s also helpful to have a piece of wood or metal to transfer the PCB to after reflow, as it will be very hot and you don’t want to set it down on a kitchen counter. Finally, I like to have a 1/4″ aluminum plate on top of my hot plate to even out the temperature and provide a smooth surface. Another neat trick is to place a small chunk of aluminum or other metal on top of the hot plate and reflow only a certain section of the board. This is particularly useful if you need to remove a microcontroller from an already assembled board but don’t want to reflow the whole board.
This process can be quick; only a couple minutes for the board to reflow completely. The downside is it requires constant attention, and unless you are doing something else to preheat the boards, you’re not putting them through anywhere near the proper temperature profile, meaning that they may develop stress fractures as they cool, or the flux won’t burn off completely. Other long term issues may crop up in higher volumes. Still, it’s a personal favorite.
Hot Air
Graduating up in equipment is the hot air method. Here you would use a hot air rework station and carefully wave it over the PCB until it reflows. Don’t hover too long over any particular part as it could burn, and don’t get too close or the air might blow it off the pads. Really this method is only good for a few boards at most. It’s time consuming and tiring to hold, and the rework station is really only meant for rework, not whole boards.
Toaster Oven
The next level is the toaster oven, and beyond that is the toaster oven rebuild. Most toaster ovens are capable of getting to 450F, which is right at the top of the reflow profile for lead free solder, meaning it’s possible for leaded as well. It’s important that convection takes place, so there needs to be a fan that’s running inside to circulate the air, and the elements need to be capable of ramping up the temperature fast enough. Some toaster ovens are underpowered and can’t get hot enough fast enough, meaning the flux will burn off before the solder flows, and then it does not flow well at all.
A heavily modified oven with reflect-a-gold for better performance, an extra heating element, Arduino-based PID controller, and solid state relays. This oven was used in production for a few thousand units.
Some people like to make minor modifications to the oven (like bypassing the wiring for the fan so that it’s always on) and then just use quick settings like “frozen treats” to approximate a profile, and this works if you will be babysitting and watching for it to flow. Others go the automation route, removing the electronics or other controls and putting in PID controllers and thermocouples so that a consistent reflow profile can be had. Now it’s just a matter of putting the PCB in, pressing a button, and waiting for it to finish. Since the top of the toaster oven is usually very hot, it’s a good surface for preheating the next boards or cooling the just-finished ones.
Tabletop Oven
Now we are getting into the professional equipment, and the first kind is the desktop reflow ovens. The most common one among hobbyists and small businesses is the T962A. It uses IR as the heating method, meaning dark parts heat up faster. It also has air flow and usability issues, which is why there’s a secondary market for new controllers and upgrades for this machine (which we covered).
There are other models available, but they’re hardly better than the modified toaster ovens. If you don’t want to futz with modifying a toaster, but you don’t have the space or volume, then the desktop reflow oven is ok, but it’s difficult finding a good one.
Conveyor Zoned Oven
The factories use reflow ovens with conveyors and multiple heating zones. Just like the fancy pick and place machines have a conveyor that takes in PCBs on the left and spits them out populated on the right, the reflow ovens connect up to the pick and place output and convey the PCBs through the oven, with each heating zone representing a different part of the reflow profile, spitting cooled and completed boards out the other end. Having zones means a continuous operation takes place and it doesn’t require constant monitoring by a person, plus the machine doesn’t have to waste energy heating up only to try to dump all that heat at the end of a single cycle. Keep in mind, though, that these machines are typically in the $100k and above range, and occupy space the size of a car, in addition to pretty hefty electricity bills.
Other Considerations
Do not use these tools for food afterwards. Neither lead nor flux is healthy. Also make sure you have adequate ventilation, especially if you are doing lead-free work. Again, the flux.
There are a few factors that make repeatability challenging, and some ways to design boards to get around them. Ever wonder why thermal reliefs exist on pads that are connected to pours? It’s because it makes soldering easier and more consistent, and if two pads flow at different times then it can cause something called a tombstone, where the component sticks on one side but not the other and sticks up vertically.
Paste is a huge variable, and people can have wildly different results based on what paste they use. The stencil is extremely important as well, as different aperture size and stencil thickness means different amounts of paste dispensed, which means more likelihood of bridging when there is too much solder. The ramping speed/profile is useful to know as well, especially when you are doing things like the hot plate where you have to eyeball the profile. The reflow stages include the following steps:
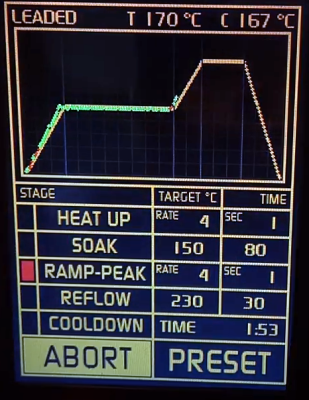
Preheat – Warm up the board from room temperature to 150C. For a minute or two.
Soak – Let it hang out below the melting temperature for a minute or two. This dries out the board and gets everything to an even temperature. If parts are hotter than others, then the solder won’t flow evenly and tombstones are likely.
Ramp – Bring it up to the reflow temperature and let it hang out until all the solder has flowed and the flux has mostly burned off. This should take about a minute.
Cooldown – Once it has peaked and everything has flowed and the flux has burned off, cool it down fairly rapidly but not too fast. If you hear crackles as the board cools, it’s cooling too fast and tiny stress fractures are happening. These fractures have the potential to break joints or even the components themselves. This should take about a minute.
Try to match that and you’ll be fine.
Reflowing is a fun experience when you can watch as the paste turns from dull gray to shiny silver, and all the components float and snap into place. It’s surprisingly easy and forgiving in small batches. Give it a shot!
Most of us have made the transition from through hole parts to surface mount. There are lots of scattered tutorials, but if you want to learn some techniques or compare your technique to someone else’s, you might enjoy [Moto Geek’s] hour-long video on how he does surface mount with reflow soldering. You can see the video below.
What makes the video interesting is that it is an hour long and covers the gamut from where to get cheap PCBs, to a homebrew pick and place pencil. [Moto Geek] uses a stencil with solder paste, and he provides links to the materials he uses.
Instead of a conventional squeegee, [Moto Geek] uses an old driver’s license which is a bit more flexible than a typical credit card. There are a few other tips and tricks you can garner from the video.
For the reflow oven, [Moto Geek] uses a modified toaster oven. However, you can get cheap reflow ovens that are made for that purpose. In the end, the results look good. This is one of those rare videos where you feel like you are in the shop looking over his shoulder while he builds his boards.
There are almost as many ways to reflow a surface-mount circuit board as there are hackers. Today, we add another method to the list. [Dasaki] converted a halogen floodlight into an SMT oven, and did so with all the bells and whistles. Check the video below the break.
We’ve actually seen the low-tech version of this hack before, but it’s nothing we would want to use on a daily basis. [Dasaki] needed to get 100 boards done, so it was worth the effort to get it right.
The floodlight was a natural choice — it’s got its own built-in chamber, and when [Dasaki] tested it out, it got up to 300 °C at 5 °C/sec and showed no sign of stopping. Contrast with toaster ovens which start complaining around 250 °C, if they make it at all. Aside from the lamp itself, the rest is standard temperature-controller fare, a SSR and a thermocouple interfaced with a microcontroller. Code is up on his GitHub.
We’re partial to skillets ourselves, but a professional halogen/IR unit is Bil Herd’s favorite. Indeed, there are so many ways to get the job done, ranging from the hacky to the nearly-professional, that you’re sure to find the reflow oven design that fits your budget and tolerance for fooling around. [Dasaki]’s halogen lamp oven looks like a worthy addition to our list.
If you need a reflow oven, you can very easily head down to Walmart or Target and pick up a toaster oven for fifteen bucks or so. Even without any control electronics, a bone-stock toaster oven works well enough for reflow soldering, but if you want to do it right you’ll also want to add a themocouple, a microcontroller, and maybe a fancy display. That’s option one.
If you value your time more than your money, you’ll probably just plonk down a few hundred bucks for a T-962A reflow oven, the standard infrared oven that’s meant for reflowing solder. It’s a good oven, but as with all bargain basement tools from China, the user interface isn’t great. [PhillyFlyers] is working on a drop-in controller for what is probably the most popular reflow oven on the planet, and this thing looks good.
This is a controller for the T-962A oven that includes all the connectors as the stock control board. We’ve seen a few of these projects to improve cheap tools, from 3D printer controllers to a replacement board for the ubiquitous K40 laser cutter. Now the most popular reflow oven is getting the same treatment.
The specs for this replacement board include a five-inch, 800 x 480 display, powered by an STM32H7 microcontroller. All of the usual functionality of the oven is retained, but it adds the ability to hand-draw reflow profiles, save reflow profiles to an SD card, and support for four K-type thermocouples. Basically, it’s what you would expect from an upgraded version of the T-962 oven.
Most importantly, this is a direct drop-in replacement for the stock electronics. Grab one of these boards, and all you have to do for installation is break out a screwdriver. It makes a great tool even better, which is exactly what this very popular reflow oven needs.
We’ve seen plenty of simple reflow ovens, and there’s an excellent chance that some of the people reading these words have even thrown their own together. A minimal example isn’t much more than a old toaster oven, a Solid State Relay (SSR), a thermocouple, and a microcontroller to get them all talking. But if you’re like [Mangy_Dog] and willing to put in a bit more effort, the final result can be a capable piece of equipment that will be the envy of the hackerspace.
This build started as most do, with a search for a used toaster oven. But in the end he actually found a German model cheap enough that he could buy it new without going over budget for the project. Though he soon found out why: when it arrived, the so-called “pizza oven” was far smaller than he’d imagined. Luckily, it ended up being the perfect size for PCBs.
Unfortunately, the heating elements weren’t quite where he wanted them. Even after wrapping the heating chamber with ceramic insulation, a feature that was likely left off the original oven to cut costs, he says the temperature would only rise about 1 degree per second. So he added an additional halogen heating element at the top of the oven which pushed that rate up to 6 degrees per second.
Control is provided by an Arduino Pro Mini and a touch screen display with some very slick graphics. There’s the expected thermocouple to detect the current temperature, but while the earlier versions of the electronics used the aforementioned SSR to control the heating elements, [Mangy_Dog] eventually replaced it with a dimmer module rated for 4000 watts. After coming up with a circuit that allowed him to control the dimmer with the Arduino, this module gave for much finer control over the chamber temperature. Plus it apparently kept all the lights in his house from flickering when the elements kicked in at 100%, which was a nice bonus.
Very often, particularly on the Internet, we’re fooled into thinking bigger is always better. The fact remains that this isn’t always the case. When it comes to reflow ovens, for example if you’re working with short runs of small PCBs, or if you just don’t have a lot of space in the workshop, a smaller oven will be more desirable than a large one. It’s factors like these that drove [Sergi Martínez]’s latest build.
Built inside a metal project case, first attempts involved using an off-the-shelf heating element, with poor results. The element had a high thermal inertia, and was designed for use in water, so didn’t last in the reflow application. Learning from the experience of others, [Sergi] switched to using halogen lamps, netting much greater success. An Arduino Nano is responsible for running the show, using firmware developed by [0xPIT]. There’s also a screen for monitoring reflow profiles, and a cooling fan to help keep temperature in the ideal zone.
It’s a tidy build that would be particularly useful for quickly running batches of small PCBs without the long wait times required to heat a larger oven. Energy efficiency should be better, too. Of course, if you’re a fan of the classic toaster oven builds, we’ve got those too. Video after the break.


 The controller was a mashup of the existing oven’s keypad and an add-on LCD display (see right). One thing we didn’t see was a schematic. Of course, you can read the code and figure out how it is all connected and (unless you use the exact same oven) you are probably going to need to modify things to suit your particular setup, anyway.


 We start with [Kuro] a


 Now we are getting into the professional equipment, and the first kind is the desktop reflow ovens. The most common one among hobbyists and small businesses is the T962A. It uses IR as the heating method, meaning dark parts heat up faster. It also has air flow and usability issues, which is why there’s a secondary market for new controllers and